Organization Planner
How to use planner features to help schedule, plan, and verify you have the necessary resources allocated to complete your projects.
Planning has become a high priority due to the labor shortage. What used to be a fairly easy process is now much more difficult – with a lot of dependencies and a potentially large impact on -the budget. Resources like workforce and equipment need to be planned and allocated for jobs in order to meet the final schedule.
The Organization Planner will help you lay out all your resources in one view to better understand where your assets are allocated and verify that you have the necessary resources to complete your projects.
The Planner allows you to create resource lists for workforce and equipment, add activities to your projects, and assign resources from the lists to those activities.
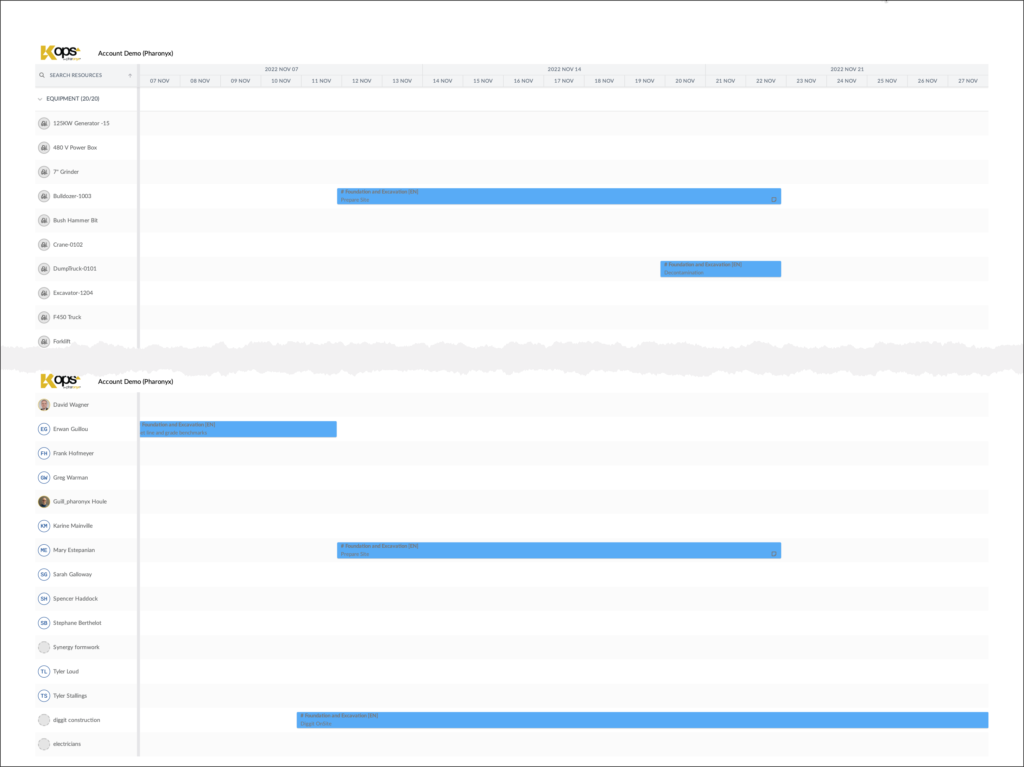
The workforce and equipment resources assigned to your projects are displayed on a horizontal timeline (similar to a Gantt chart) so you can see how you are using all of your resources and if they are overbooked. Workforce resources can be used for known (or unknown) individuals, self-performing teams, subcontractors, or any other personnel. Equipment resources can be used for heavy machinery, other vehicles, tools, mobile devices, or virtually any other company asset.
You have the ability to:
- Specify which users have access to view and edit the planner.
- Change display colors to easily identify activities associated with specific projects.
- View the planner timeline in hours, days, weeks, or months.
- Filter and show the activities for one project, multiple projects, all projects, or those not assigned to any project.
- Search and find activities that match a certain search term.
- Highlight specified activities.
- Export the planner timeline to Excel to print or share with others.
NOTE: Only users granted Org Planner access by the Account Administrators can view and edit the Planner module.
See below for more information and instructions:
Assign Org Planner Access
Add Workforce Resources
Associate a User to a Placeholder
Add Equipment Resources
Rename or Delete a Resource
View Resource Information
Create an Activity
Edit Existing Activities (edit, move, link predecessor/successor activities, delete)
Search, Filter & Highlight
Change the Timeline View
Export the Organization Planner Timeline
Assign Org Planner Access
Account Administrators control which users have access to the Organization Planner. Only users with Org Planner access will see the Planner module on the left side navigation menu.*
*Account admins have Org Planner access by default.

- Click Account Admin.
- Click Managers under Account Managers on the menu.
- Click the ellipsis to the right of the user you want to give or remove Org Planner
- Select Show Details.
- Click in the Org Planner field.
- Select Yes to give access.
- Select No to remove access.
Add Workforce Resources
Adding workforce resources creates a workforce list so you can plan for the people who will execute work on site. You have the option to add account users and/or create placeholders.
Creating a placeholder allows you to:
- Plan for work even if you don’t yet know who will be doing it.
- Plan for work even if they are not a current K-Ops user.
- Plan for groups of people.
You can associate a K-Ops user to the placeholder later if needed.

NOTE: The very first time you add a resource, you will click ADD RESOURCES, select Workforce, and proceed to Step 2.
- Click the + to the right of WORKFORCE
OR
Click the + to the right of SEARCH RESOURCES and select Workforce. - Select from the list of Available Users and/or type in a PLACEHOLDER LABEL and press Enter. (You can type in multiple labels, pressing enter after each one.)
- After you have selected all the Available Users and/or entered all the placeholders you need, click ADD.
Associate a K-Ops User to a Placeholder
- Click the ellipsis to the right of placeholder name or right click on the placeholder.
- Select Associate User.
- Select a user from the AVAILABLE USER dropdown.
- Click SAVE.
The placeholder label will no longer appear on your workforce resource list. It will be replaced with the user’s name and all activities that were connected to the placeholder will now be connected to the associated user.
Add Equipment Resources
Adding equipment resources creates a company equipment list you can reference project after project, so you won’t have to create new equipment resources every time you plan.

NOTE: The very first time you add a resource, you will click ADD RESOURCES, select Equipment, and proceed to Step 2.
- Click the + to the right of EQUIPMENT.
OR
Click the + to the right of SEARCH RESOURCES and select Equipment. - Type in an EQUIPMENT LABEL and press Enter. (You can type in multiple labels, pressing enter after each one.)
- After you have entered all the labels you need, click ADD.
Rename or Delete a Resource
NOTE: You cannot rename users, only equipment or placeholder labels.

- Click the ellipsis to the right of resource name or right click on the resource.
- Select Rename or Delete.
- If renaming, type in a NEW EQUIPMENT LABEL or NEW PLACEHOLDER LABEL and click SAVE.
If deleting, click YES to confirm delete.
NOTE: Deleting a resource will remove any activities that are only assigned to that individual resource. If an activity is assigned to multiple resources, it will not be removed.
View Resource Information
To focus on managing resources, you can expand the resource view to see email information for your Account Users designated as Workforce Resources and project information for each resource (both workforce and equipment).

- Hover on the gray line that separates the Resource List from the Timeline.
- Click the right caret to expand the resource view.
- Click the caret at the right side of the screen to return to the timeline view.
Create an Activity

- On the line beside a resource, either right click and select Create activity or click and drag to the left.
- Enter required information on the DETAILS (See field descriptions below if needed.)
- You can enter information on the other tabs at this time or edit later if needed.
NOTE: You will usually just enter the DETAILS info and maybe NOTES at this time. Linking Predecessor/Successor activities will usually be done at a later point in the process. See the Working with Existing Activities section.
- PREDECESSOR(S) – Allows you to link activities. Activities listed on this tab can never appear on the timeline after the activity that was just created. On the planner, linked activities will show arrows connecting them.
Click the green + button to select an activity to link.
(See field descriptions ) - SUCCESSOR(S) – Allows you to link activities. Activities listed on this tab can never appear on the timeline before the activity that was just created. On the planner, linked activities will show arrows connecting them.
Click the green + button to select an activity to link.
(See field descriptions ) - SETTINGS – You can set constraints regarding the timeline of the activity, set constraint and unlock dates for the activity, make the activity inactive, and change the project display color on this tab. (See field descriptions )
- NOTES – You can add optional notes to the activity on this tab. On the planner, the activity will show a note icon that you can double click to open.
- Click SAVE.
Field Descriptions:
DETAILS Tab
PROJECT* – Select an existing project from the dropdown, or you can leave it “Unassigned” if needed.
NAME* – Enter the name of the activity (“New activity” is populated by default).
RESOURCE(S) * – You can assign additional equipment and/or workforce resources to this activity from the dropdown.
START* – Enter start date of the activity.
FINISH* – Enter end date of the activity.
DURATION – Duration of activity is automatically populated from the start and finish dates.
*Required fields
PREDECESSOR(S) Tab
NAME: A drop-down of existing activities that you can link to the current activity.
TYPE: Relation between both activities.
LAG: Number of days this predecessor requires during current activity.
SUCCESSOR(S) Tab
NAME: A drop-down of existing activities that you can link to the current activity.
TYPE: Relation between both activities.
LAG: Number of days this successor requires during current activity.
SETTINGS Tab
CONSTRAINT TYPE: A drop-down menu of constraints regarding the timeline of the activity.
CONSTRAINT DATE: Date that relates to the selected constraint type.
UNLOCK START DATE: When checked, the start date of the activity will not be constrained by its dependencies.
INACTIVE: When checked, the activity becomes inactive and stops taking part in the project scheduling. It does not affect linked events, or it’s assigned resources allocation.
PLANNER COLOR: Selecting a new color will affect all activities from the same project.
Edit Existing Activities

Move Activities and Change Activity Durations*
To move an activity to a new location on the planner, you can click, drag, and drop the activity or cut/copy/paste using the instructions below.
To reduce or extend the activity date/time range, you can drag the edge of the activity left or right respectively or follow the Edit Activity Details instructions below.
Create Predecessor/Successor Relationships*
You can create linked Predecessor and Successor activities directly on the planner by dragging the end point of one activity to the starting point of another or follow the Edit Activity Details instructions below to update the PREDECESSOR(S) or SUCCESSOR(S) tab.
Predecessor activities can never appear on the timeline after the activity and Successor activities can never appear on the timeline before the activity to which it is linked.
*Linked activities will automatically be updated when changes are made.
Edit Activity Details
- Right click on the Activity.
- Select Edit from the list.
- Update the desired information on DETAILS, PREDECESSOR(S), SUCCESSOR(S), SETTINGS, or NOTES (See field descriptions if needed.)
- Click SAVE.
Copy or Cut an Activity
- Right click on the Activity.
- Select Copy activity or Cut activity from the list.
OR
- Click on the activity.
- Use keyboard shortcut:
- Ctrl + X / Cmd + X to Cut.
- Ctrl + C / Cmd + C to Copy.
Paste an Activity
- Right click in a blank space on the planner.
- Select Paste from the list OR use keyboard shortcut Ctrl + V / Cmd + V
Delete an Activity
- Right click on the Activity.
- Select Delete activity.
- Click DELETE to confirm.
OR
- Click on the Activity.
- Click Delete or Backspace button on the keyboard.
- Click DELETE to confirm.
Search, Filter & Highlight

You can search or sort resources using the SEARCH RESOURCES bar and arrow at the top of the resource list; sort is done alphabetically A-Z or Z-A.
You can search activities using the magnifying glass on the top toolbar. The search will look for matches in the activity Name field, Notes, and the Project field; activities that do not match the search criteria will be hidden from view.
You can filter which projects are showing on the planner by clicking the PROJECTS (ALL) button on the top toolbar. The dropdown allows you to select specific projects, unassigned projects, or all projects.
The highlighter icon on the top toolbar allows you to add a color shadow around projects that match the criteria you type in the Highlight activities field. Activities that do not match the highlight criteria will still be shown, but more subdued so it’s easier to see the highlighted items in context.
Change the Timeline View

You can change the timeline view to Months, Weeks, Days, or Hours using the display dropdown on the top tool bar or the zoom (– and +) buttons at the bottom right of the screen.
Within any view, you can use the scroll bar at the bottom of the screen to move forward or back in time. If you prefer to quickly pan with your left mouse button (instead of left clicking to create activities), you can click the Settings icon on the top tool bar and change the Left Click Action to Pan.*
Clicking the TODAY button will bring the planner view back to the current date.
The Row Height and Bar Margin can be adjusted by clicking the Settings icon on the top tool bar.
*It’s probably easiest to initially plan with the Left Click Action setting as Create Activity, then switch to PAN to review the schedule.
Export the Organization Planner Timeline
The following article describes how to export the K-Ops Organization Planner Timeline so you can save, share, or print it.

The timeline can be exported in the following formats:
- PNG
- Excel
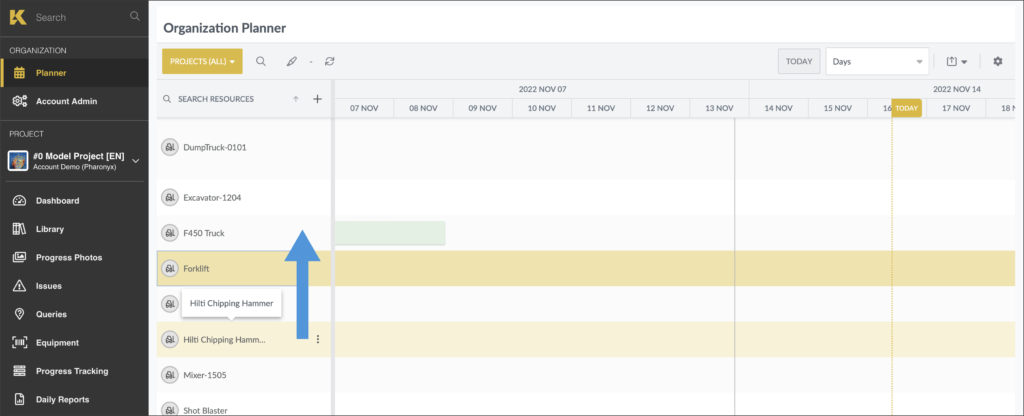
Reorganizing Resources Before Exporting
When the Organization Planner is first displayed, it is organized by EQUIPMENT and WORKFORCE, in alphabetical order.
To optimize the display of your planner exports, you can reorganize the resources to display the most useful ones at the top of the timeline. This avoids having large empty spaces in the exports.
Exporting the Timeline
TIP: You can upload the file to your K-Ops project libraries to share your plan with your team.
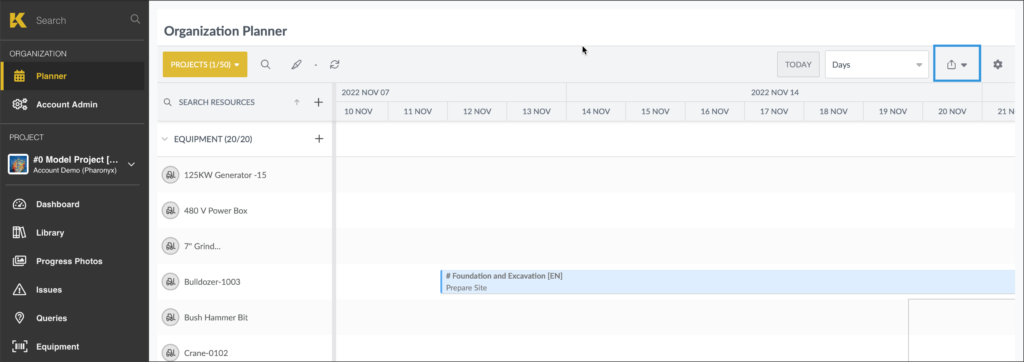
1. From the left-side navigation menu, select the Planner.
2. Click the Export icon in the upper right corner.
3. Select the export file format from the drop-down.
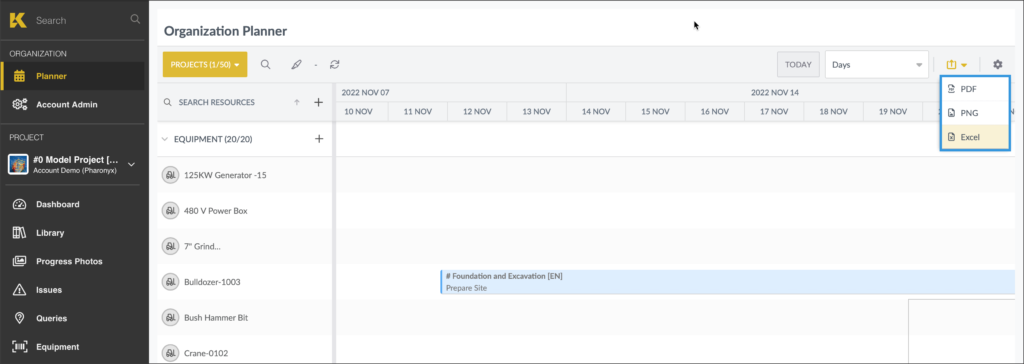
4. The Excel file format will export automatically. For PDF and PNG Exports, select the required values from the drop-down menus:
- PLANNER RANGE: Complete schedule, Visible schedule, or Date range (when selecting Date range, fields to provide the beginning and start dates will appear)
- ROWS: All rows or visible rows
- PAGINATION (PDF Only): Single page, Multiple pages, or Multiple pages (vertical)
TIP: To view the complete project, we suggest choosing the Multiple pages (vertical) option.
- PAPER FORMAT: A6, A5, A4, A3, Legal, or Letter
- ORIENTATION: Portrait or Landscape
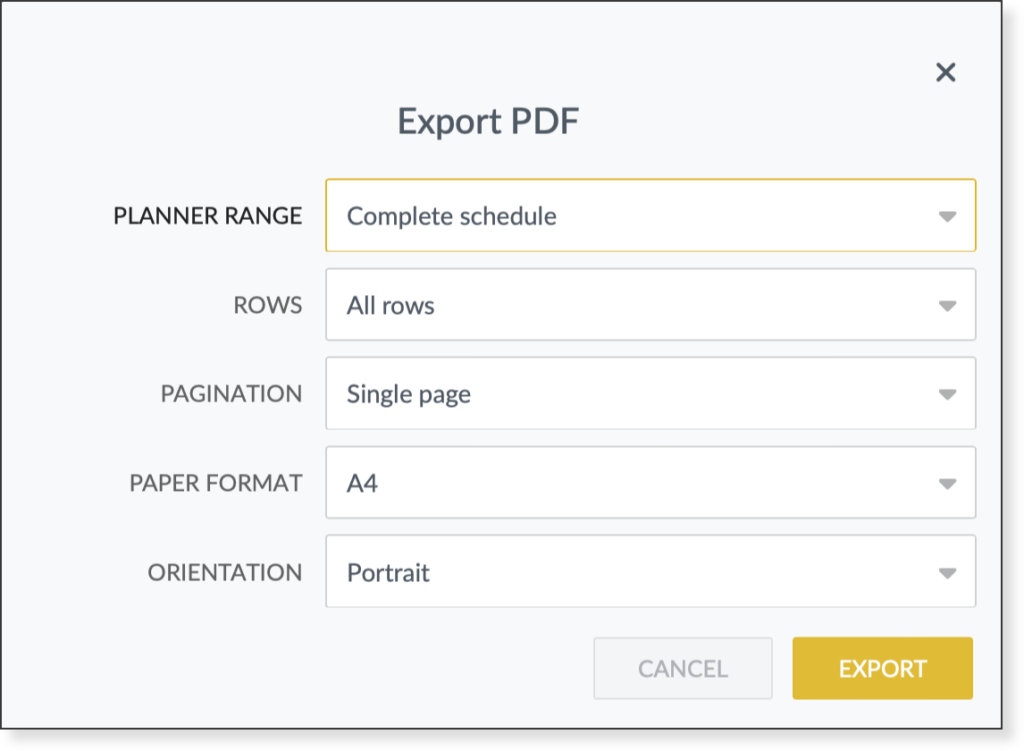
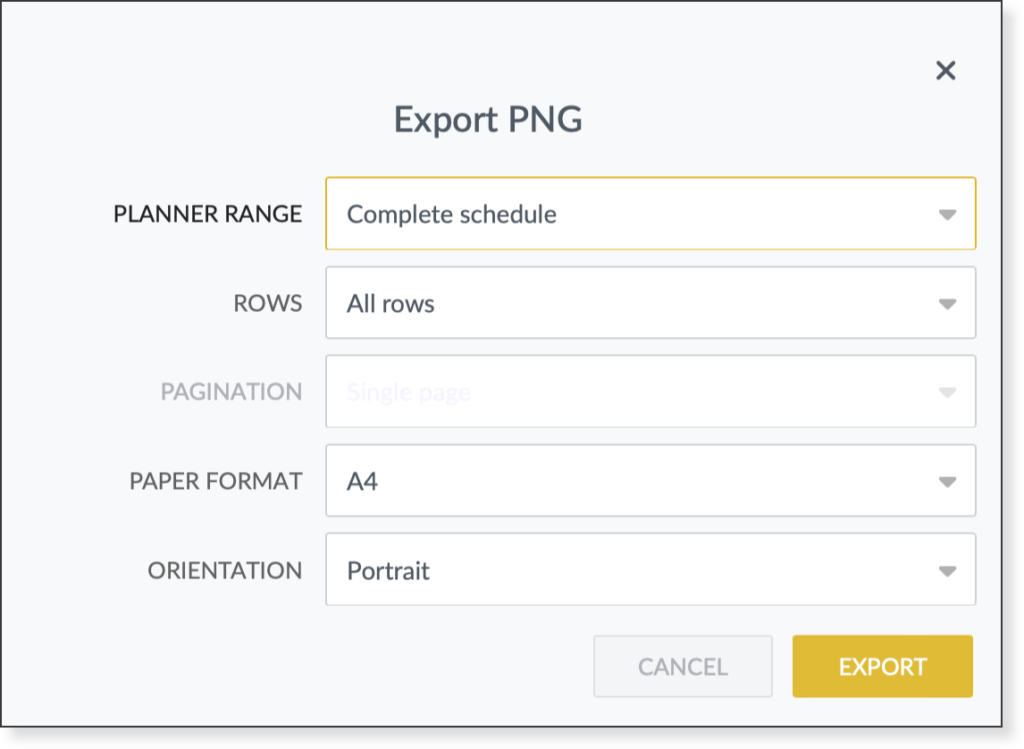
5. Click Export.

6. The file(s) will be downloaded into your downloads folder.
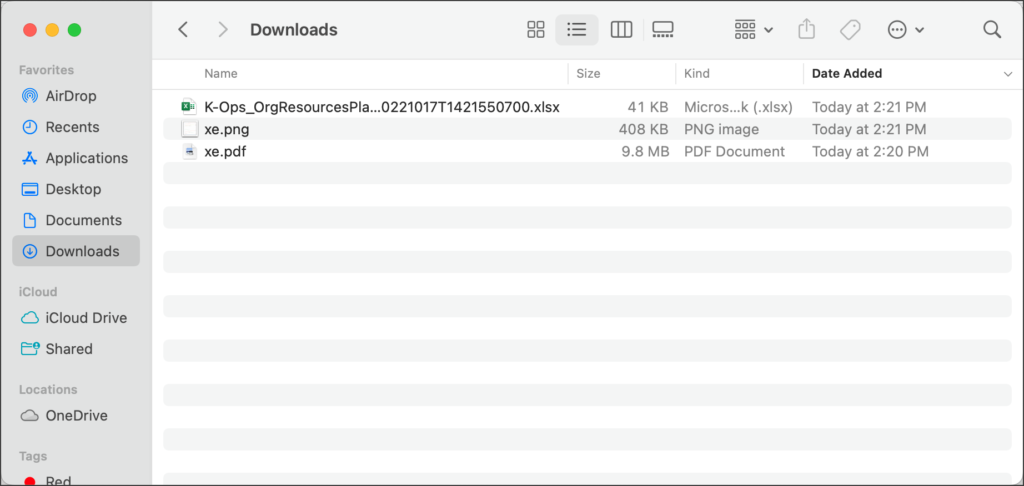
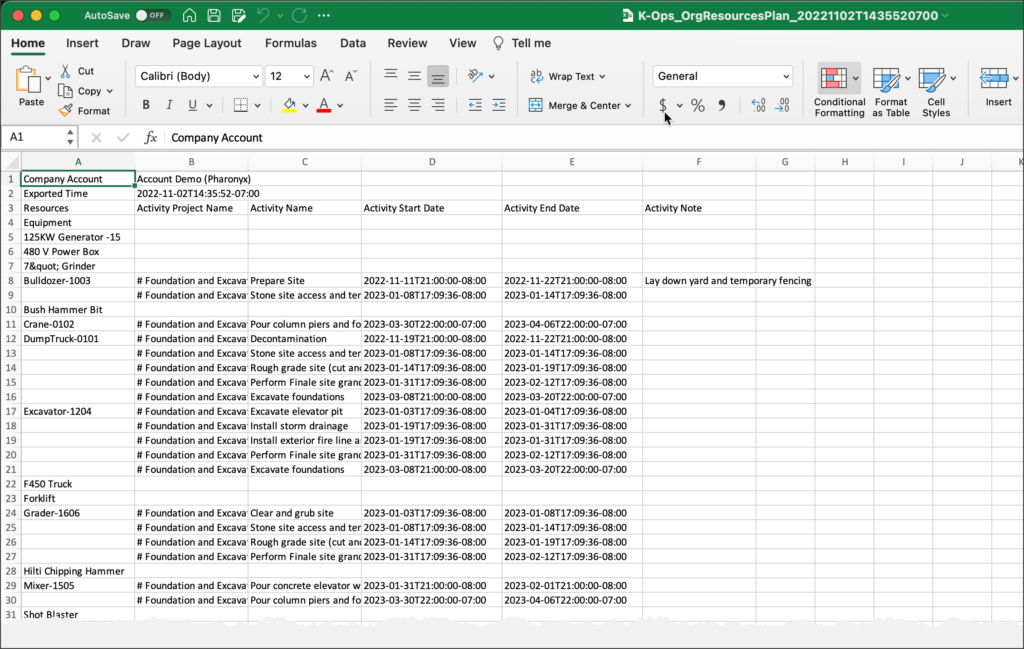
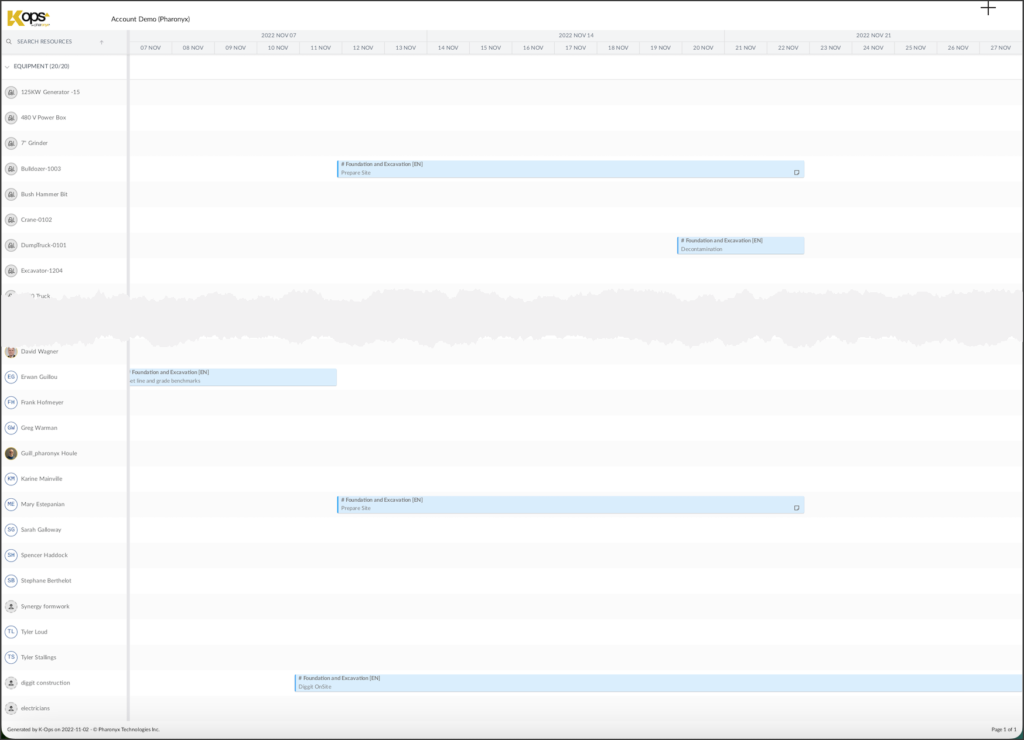
7. The exported documents will look as follows:
PNG
Excel